")
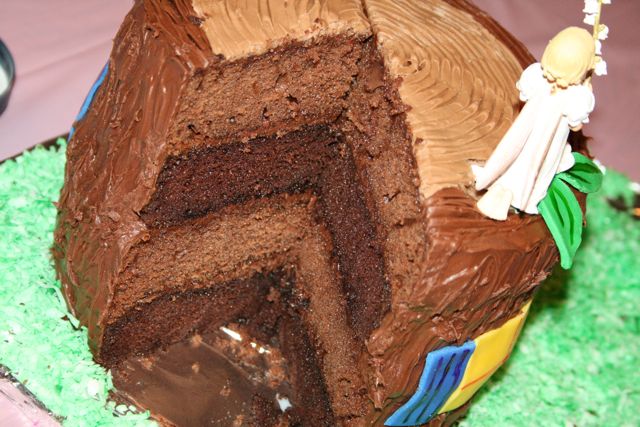
I’ve had a couple emails asking for directions on how to make the Fairy House Birthday Cake I made for Chiquita’s birthday, so here is a quick tutorial. It really was quite easy to make and this is coming from someone who had to be convinced to even try decorating a cake just two years ago! Of all the cakes I’ve made, this one and Captain’s Tank Cake are my favorites. I’m so glad that my sweet friend convinced me to give it a shot and create such wonderful memories for my children.

Ingredients:
- 4 – 8″ Round Cakes (I used two boxes of cake mix – 1 Milk Chocolate and 1 Triple Chocolate)
- Milk Chocolate Frosting
- White Frosting mixed with a little Creamy Peanut Butter to make a light brown Frosting
- Coconut mixed with some Green Food Coloring for Grass
- Fondant (I used blue, yellow, and green from this Wilton Multi Pack)
- Food Decorating Gel (to paint accents on the door, windows, shutters, and leaves)
- Sugar Flowers
Directions:
- Trim the cakes so that they are nice and level. I’m sure there are better ways to do so, but I just used my long serrated knife. I did it quickly and if you look closely my cake is slightly slanted! 😉
- Stack the cakes frosting between each layer. (I flipped them over so I was frosting the bottoms of each cake instead of the trimmed top, making it easier to frost .)
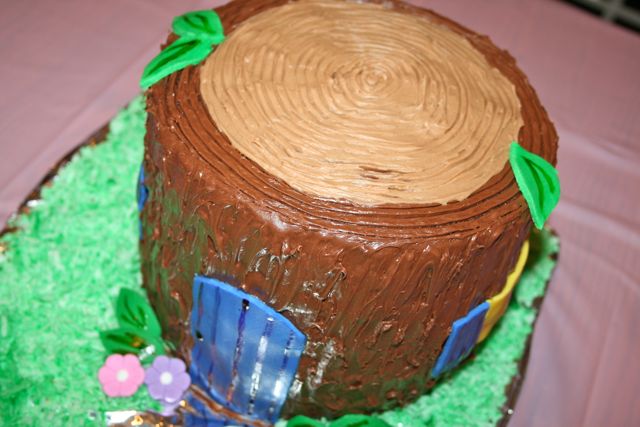
- Frost the outside of the cake and a ring around the outside of the top with chocolate frosting. (Use a knife, or in my case clean finger) to add texture to the “bark.”
- Frost the top of the cake, inside the dark brown ring, with a light brown frosting.
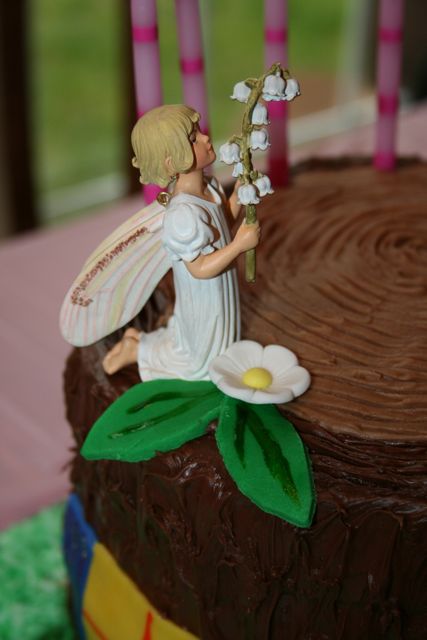
- If you’d like to add growth rings like I did, just use a fork to create multiple rings at once, starting at the outside of the circle and working your way towards the inside with just a dot in the very center. (My husband is a Forester, so this was very important! My children all counted the rings to see how “old” this tree was before it was cut down!)
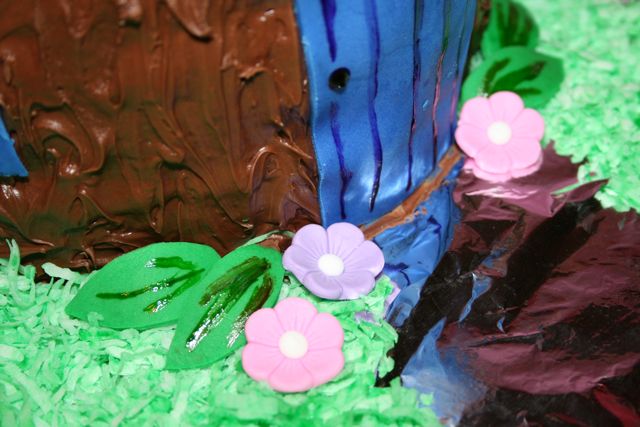
- Sprinkle coconut grass around the base of the house, covering your serving platter. (I covered my tray with foil first and then a trail making a pretty shining pathway leading up to the front door. Simple and cute!)
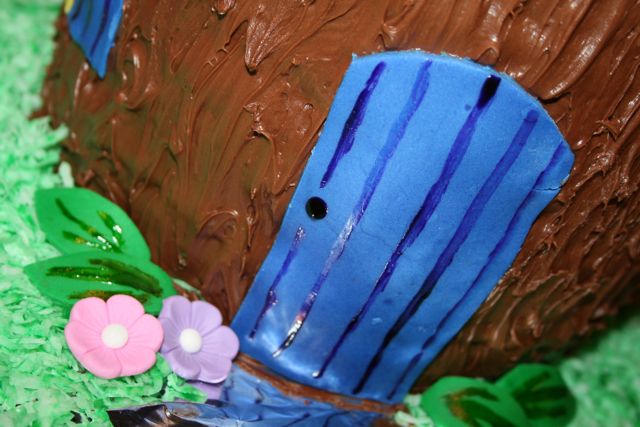
- Decorate the Fairy House with a door, two windows, and shutters cut out from Fondant. Using a small paint brush and food gel, add accents. Cut leaves out of Green Fondant and place around the house for decoration. You can also add decorative sugar flowers as well.
- I added a couple Cecily Mary Barker Flower Fairy Ornaments (purchased from The Turtle Trail) to the top of our cake. They are even cuter in person! They come with floral picks which make them quite easy to place securely on the cake.

I think that is everything?! If you have any other questions, feel free to ask in the comment box. Also, if you end up making this cake, I would LOVE to see pictures!!

Oh! And one more thing… Either invite lots of friends and family over for cake, or be prepared for start calling the neighbors! 😉


You did a great job making the cake! It look's awesome!
I have some tiny 6 inch round cake pans. I might just do this for no reason at all. It's so cute Jessica.
One of the cakes that inspired our cake, made by my friend Aimee's mother, was made using 6" pans and turned out darling!
Thank you! I think that I might try this for my daughter's birthday this summer. We had intended to have a flower fariy birthday party last year, but we didn't. You have given me just the inspiration that I needed.
Wonderful job, Jessica!
I just have one question…
How hard was the fondant to do? I've heard it's tough to work with.
It kinda scares me, lol. 😉
Thank you for sharing your tutorial!
God bless.
Kelly ~ This was the very first time that I've ever used Fondant. I just updated the post with a link to the Fondant that I used. I too have always been scared attempt anything made with Fondant, but it was part of a Christmas Gift from my MIL and thought I'd give it a try. I was actually surprised with how easy it was! Perhaps the fact that the color was already mixed in made a difference, but all I did was break a chunk off and roll it out on some wax paper with my Pampered Chef rolling pin. I felt like I was playing with Playdoh! lol! I then just used a knife to cut out the shapes I needed, and kitchen shears for the leaves. Hope that helps!
The 6 inch pans worked well, but we only used 3 layers instead of 4. One cake mix was enough to make 3 full layers. My mom also made a chocolate buttercream filling and put it on pretty thick between the layers.
This size fed 9 children, 2 adults, and there was plenty left over.
Jessica, you did such a good job! I'd love to see more pictures from Chiquita's birthday.
Wow! I didn't know you could buy it already made and colored! I might actually be brave enough to give it a try. 😉
Again, thanks so much for all the tips!
God bless you!
You are my Sunshine! I'm passing on an award to you today at my blog..stop by when you get the chance. Happy Mother's Day!
Let us see if I am brave enough to try this for a certain girl turning 4 this summer!
Oh and is it just me, but only one post is showing up on your homepage. I had to get the link from my google reader to see this one. 🙁